Curious about microdermal piercings? We showcase some of the coolest piercings and explain all about the procedure, cost, and pain!

Versatile and suitable for even hard-to-reach places, microdermal piercings are currently at the height of popularity.
In this article, we’ll cover everything you need to know about this type of piercing – from the microdermal cost and procedure to jewelry options and safety concerns.

What are microdermal piercings?
Microdermal piercings, often simply referred to as ‘dermal piercings’, are single-point surface piercings.
With most other kinds of piercings, there is an entry point and an exit point for the needle – and later the jewelry – to go through.
Microdermals are single-point: meaning they don’t enter and exit the skin at different points.
Microdermal jewelry consists of an anchor and a bead. The anchor, round-based or footed, is placed underneath the skin. It’s usually only 6-7mm in length – just enough to secure the piercing in place.
Only enough of the anchor shows on the surface to enable you to attach the bead.
The beads take various forms, from very simple metal balls to diamond studs, spikes, and other aesthetic choices.
The end result is that only the bead is visible, as if it was resting on the surface of the skin.

Because of its single-point nature, a microdermal piercing can be done just about anywhere on the body, including areas inaccessible with other kinds of piercings.
You can get a dermal piercing on the chest, cheek, hip, the back of the neck – and literally anywhere else.

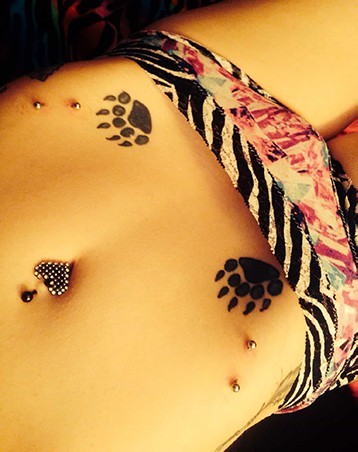
Thanks to dermal piercings being so versatile, it’s possible to get really creative with their placement and arrangement.
Getting several piercings in the same area to form a pattern is a common choice, as is using them to compliment tattoos and other body modifications.
Microdermal vs surface piercings
There’s sometimes a bit of confusion between microdermals and surface piercings.
The difference is that although surface piercings also go underneath the skin, they take the form of a bar that has an entry point and an exit point.
Dermal piercings, meanwhile, are single-point: they only involve one hole in the skin.

Microdermal piercing procedure
Depending on the piercer, the salon, and sometimes even your personal preference, there are two ways to insert a microdermal piercing: with a piercing needle or with a dermal punch. The procedure is as follows:
- After discussing the piercing and agreeing on the exact placement, the piercing professional sterilizes the area. This is an incredibly important step that should not be omitted under any circumstances, as it’s essential to minimizing the risk of infection and other unpleasant complications. If the piercer attempts to proceed with the piercing without sterilizing your skin first, that’s a sure sign it’s time to leave and find another piercer.
- Using a surgical marker, the piercer marks the exact spot where the piercing will be placed.
- The skin is pierced to create space for the anchor, either using a needle or a dermal punch.
- The piercer places the anchor in the newly created space underneath the skin, using forceps. The anchor has to be placed exactly parallel to the surface of the skin.
- The bead is attached to complete the jewelry set.
After the procedure, the piercer should provide you with instructions on how to care for your piercing during and after the healing period.

Needle vs dermal punch
Since there are two methods of inserting a microdermal piercing, you’re bound to be wondering which one is better.
Assuming the piercing was done by a skilled professional, there will be no difference in how the piercing will ultimately look, regardless of the method.
The difference lies in how the space for the anchor is created. With the piercing needle method, the needle is inserted into the skin at an angle and then pulled out.
This separates the tissue enough to create a ‘pocket’ into which the anchor can be placed.

A dermal punch, meanwhile, actually removes a small piece of tissue, creating a tiny ‘tunnel’ for the anchor.
Dermal punches are outfitted with safety mechanisms that help the piercer ensure that the tissue is not damaged and the punch not too deep.
Although the dermal punch method sounds more painful – we’re removing a piece of flesh entirely, after all – it’s actually not.
Most people report that a microdermal piercing done using a needle is more painful than when using a dermal punch.
How much is a dermal piercing?
The dermal piercing prices will vary across areas and studios. The typical dermal piercing cost falls somewhere between $70 and $100, though this is by no means a guarantee.
In general, studios in large cities tend to charge more, and small-town prices are usually lower.
To find out how much microdermals cost in your area, your best bet is to visit or call several piercing studios and pick the best price to quality ratio.
Remember that some studios don’t include the jewelry in their pricing, so you might be expected to pay an extra $15-$20.
As always with piercings and every other kind of body modification, remember that the price is not the most important factor.
It doesn’t make any sense to try to save money on a piercing or a tattoo by going to an inexperienced or amateur piercer.
You might spend $20 less on the piercing itself, but the likelihood of the effect not meeting your expectations, getting infected, or being rejected is much higher.

Aftercare
As we’ve already mentioned, the piercing professional should provide you with aftercare instructions for your dermal piercing.
It will take between one and three months for a microdermal piercing to completely heal. If any complications occur, such as infection or other consequences of improper care, it may take considerably longer.
The aftercare guidelines are usually based around the following principles:
- Clean the piercing site twice daily – sea salt, saline solution, or dedicated piercing products are all good choices. You can make saline solution at home by mixing salt and water.
- Wash your hands with antibacterial soap before cleaning the piercing
- Pat the area dry with a clean towel after cleaning the piercing or taking a shower – it’s important for the towel to be completely clean and dry. It’s best to use disposable paper towels.
- Between cleansings, you may notice some ‘crust’ forming around the piercing area. This is a normal reaction, and the crust can be wiped away gently using a clean Q-tip.
Depending on where your dermal piercing is located, your piercer may recommend keeping the area covered with a bandage during the first few days.
It’s also recommended to cover the piercing if possible to prevent it from getting wet while you shower.

Now for some things to avoid:
- Try not to wear any tight clothing around the piercing. This is to prevent it from getting caught on the material – you can imagine what would happen if the jewelry got stuck in your shirt, for instance, and you accidentally yanked on it. It’s also a hygiene concern – you don’t want the material rubbing against the wound.
- Don’t be tempted to use any antiseptic or antibacterial products on the actual piercing. Antibacterial soap is necessary for cleaning your hands prior to cleansing the piercing site, but the piercing itself should only be rinsed with saline solution or other designated products.
- If your microdermal is located on your face, take extra care not to apply makeup anywhere near the piercing site.
- You shouldn’t take the jewelry out until the piercing site is completely healed – generally up to three months. This includes changing the bead on the anchor. You could end up displacing the anchor, which would result in tissue damage and a ruined piercing.
- In fact, try not to touch the piercing at all, especially during the first few months.
- As the piercing heals, you shouldn’t submerge the area in water – including baths, pools, lakes, and so on. These are a serious infection risk and should be avoided.
- As we’ve already mentioned, ideally, clean paper towels should be used to pat dry the piercing area if it gets wet. You should never use a fabric towel that’s not completely clean, and absolutely avoid using shared towels.
One more thing to keep in mind concerns hair. If you have long hair and your piercing is located somewhere where the hair can reach it, make sure the hair doesn’t get tangled up in the jewelry.
If your hair gets caught on the bead, you could accidentally displace the piercing.

Risks
Just like every other kind of body modification, microdermals carry certain risks.
An error on the piercer’s part could result in tissue damage or displacement. Tissue damage happens when the anchor is inserted too deeply, injuring a nerve or a blood vessel.
Conversely, displacement happens when the anchor isn’t inserted deep enough. This causes the anchor to move to another area of skin.
Both of these risks can be minimized by choosing an experienced piercing professional. This is part of the reason why it’s important not to try to save money on the procedure.
Inserting a microdermal is very tricky, and it’s definitely worth paying more to ensure it’s done correctly.

Another risk to keep in mind is rejection. Rejection is an issue common to most types of piercings, and refers to the body pushing the anchor out.
This happens when your body recognizes the anchor as a foreign object and, by a defense mechanism, skin tissues expand to expel the foreign body.
Last but not least, by getting a microdermal piercing you run the risk of infection. This risk is greatly minimized by disinfection during the piercing process and proper aftercare.
It’s normal for the piercing site to be a little bit swollen during the first two weeks or so. Similarly, there is likely to be some crust forming around the bead of the jewelry during this time. Both should decrease as the piercing heals.
If these symptoms persist for longer than a couple of weeks, though, it might be worth seeing a piercing professional for a check-up.
Consult a medical professional or a piercer if you experience severe pain or major swelling in the piercing site, as this could be a sign of infection.
Similarly, unusual discharge, a rash, and skin being hot to the touch are indicators that something is wrong.
Hopefully, the risks won’t discourage you from getting the piercing that you want.
It’s important to be aware of the possible unpleasant consequences, but it’s equally important to remember that with proper preparation and care, these risks can be kept to the minimum.

Microdermal piercing jewelry
Since microdermal piercings are the only ones that can be placed just about anywhere on the body, the sky’s the limit where it comes to creative choices.
The chest and the back are common placements for this piercing, partly because it’s difficult or downright impossible to place any other type of piercing in these areas.
A dermal neck piercing (on the back, side, or front of the neck) is another popular choice.
There is a wide variety of jewelry options available for dermal piercings, most averaging $20 in cost.
The most popular materials for dermal jewelry include surgical titanium, surgical stainless steel, and niobium. These are all hypoallergenic, meaning that they are unlikely to cause irritation.
Gold dermal jewelry is also popular, although it should be used with caution. Gold-plated jewelry is not hypoallergenic and could therefore cause allergic reactions, as well as increasing the risk of infection.
If opting for this material, 14-karat gold is usually recommended for its durability.

Remember that with a microdermal piercing, you can only change the external piece (the bead).
Once in place, the anchor should not be removed unless you decide to get rid of the piercing altogether – and even then, the removal must be carried out by a professional piercer.
Microdermals looks great both on their own and as part of a larger design. If you’re looking for something more complex than a single bead, you could consider getting several dermal piercings forming a symmetrical pattern.
Microdermals are also an interesting addition to tattoos. In the past couple of years, it’s become an increasingly popular trend to compliment an element of a tattoo with the use of a gem-shaped microdermal.
100+ Unique Inspirational Ideas